HomeGuidesProject Zomboid
Project Zomboid mechanics: how to repair cars in Project ZomboidLearn how to repair cars in Project Zomboid
Learn how to repair cars in Project Zomboid
Want to know how to repair cars in Project Zomboid?Many cars are ruined inProject Zomboid, with broken components making them impossible to drive. Fortunately, the mechanics skill lets you tinker with vehicles, allowing you to repair cars and change parts to get them running again.
Below, we’ll cover everything you need to know about repairing cars in Project Zomboid, including how to replace parts and how to level up your mechanics skill.
Top 12 Best Survival Games to Play on PCWatch on YouTube
Top 12 Best Survival Games to Play on PC

How to repair cars in Project Zomboid
Below, we’ll list which tools you need to perform certain actions and where you can find them:
Some parts, like the gas tank, brakes, and suspension, require multiple tools. The gas tank requires the screwdriver and wrench, while brakes and suspension both need a jack and wrench. You’ll also need a jack and lug wrench to remove tires.
How to install or remove car parts in Project Zomboid
When removing or installing car parts, success isn’t guaranteed. If you fail, the part will take damage and you will have to try again. As you level up your mechanic skill, you’ll have a higher chance of successfully installing and removing parts without damaging them.
If you want to remove a certain part, find the required tool and then head over to your vehicle. To install a part, either take it from another vehicle or look for it in garages, storage sheds, warehouses, and gas stations.
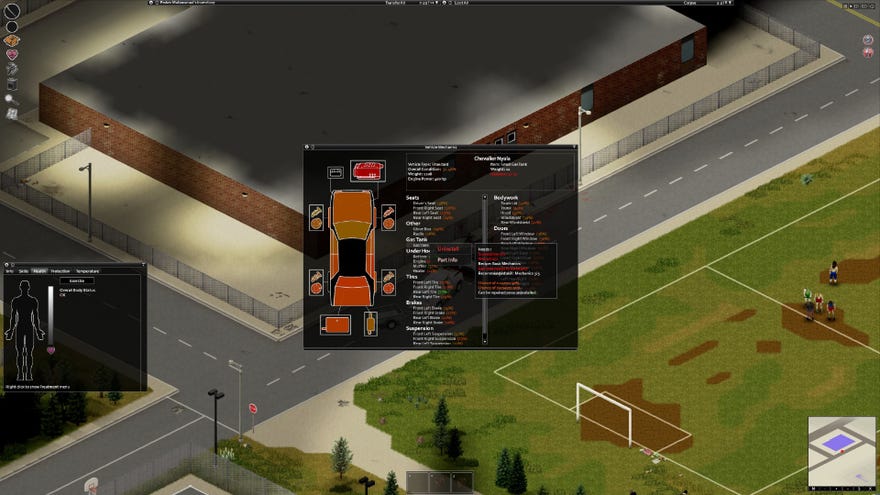
When you’re ready to work on the car, right-click on your vehicle and select vehicle mechanics. Your character will then walk over to the hood of the car and interact with it, bringing up the mechanics menu. Here, you can see some basic information about the car, such as vehicle type, weight, and overall condition, as well as the condition of each separate part.
If you want to remove or install a part, find it in the mechanics menu and then right-click on it. This will bring up the usual interaction menu, where you can choose what you want to do and see the required parts. You will also see a recommended level, but this is not a requirement. If you are under the recommended level to remove or install a part, you can still try. As mentioned above, the odds of success will increase as you level up your mechanics skill.
If you want to repair a part, you’ll need to remove it from the car before interacting with it in your inventory to repair it. This will consume certain materials, such as metal sheets and bolts, so you might need to head to a garage or storage unit to find the materials you need before you can begin repairing it.
How to level up mechanics in Project Zomboid
It’s worth noting that you only get XP the first time you remove and install a part. Repeating these actions with the same part will not yield any more XP, so you’ll need to strip cars down and then move on to find another vehicle. Fortunately, it shouldn’t take too long to level up if you use skill books and have all of the tools listed above, as you’ll be able to take every single part out of a car, which will net you lots of XP. If you fail when removing or installing a part, you’ll still gain XP for that action.
That’s everything you need to know to repair a car in Project Zomboid. If you want some more guidance so that you can survive longer in this apocalyptic adventure, check out ourProject Zomboid tips and tricks. To find out more about vehicles, take a look at our guide onhow to hotwire a car in Project Zomboid.
